Beautiful and Energy Efficient: A Collaboration Story

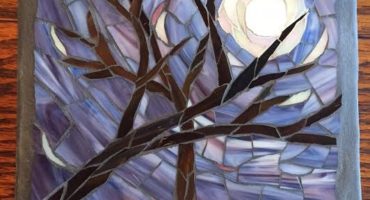
Masonry Heater with glass mosaic made by Peter Muller, which I installed.
One of the things I love most about mosaics is the opportunity to constantly re-use materials. So I was very excited when my friend Peter Muller, a talented glassblower, told me he wanted to make a mosaic to install on his new masonry heater and that he wanted to make the mosaic out of scraps of his own glasswork. The heater was built by a local mason entirely out of recycled bricks. Above the fire chamber, they put in another chamber to be used as a pizza oven, and just above the pizza oven, the mason routed out a section of brick where a mosaic would be installed. The heater is amazing- a work of art in itself. Not to mention that it’s super efficient in terms of the amount of heat it produces, and how cleanly it is able to burn wood.

Here is an image of the heater, just before the mosaic was installed, the mosaic on the floor is face down, stuck together temporarily by contact paper.
In November, I went to help Peter get started with the process of building his mosaic, teaching him the indirect method for assembly of the pieces, and creating a cardboard template the exact shape of the routed-out area. Over the next several weeks, he worked with his wife and their 6 year old daughter to design the mosaic and lay out the pieces on contact paper taped to cardboard. The glass scraps they used are stunning- rich colors with slight contour for added reflectivity.

Here you can see the mosaic in process, being built on a temporary substrate.
Last week I finally went back to install and grout the mosaic..I used a type of thin-set mortar that has additives to make it suitable to withstand heat (even though the surface of the heater would never get too hot, it’s always better to be safe!) Together, Peter and I decided on the color for the grout (a light grey), and I went back to grout it two days later, after the mortar had had a chance to set completely

Close up view after grouting
I love collaborations like this, and was excited to guide this project from a technical standpoint, while letting the creative work come from the family who will enjoy looking at for many years. The flame design is inspired by Peter’s torch glass work, and is a perfect complement to the heater itself, where the flames will burn.
Click here to learn more about amazing Masonry Heaters!