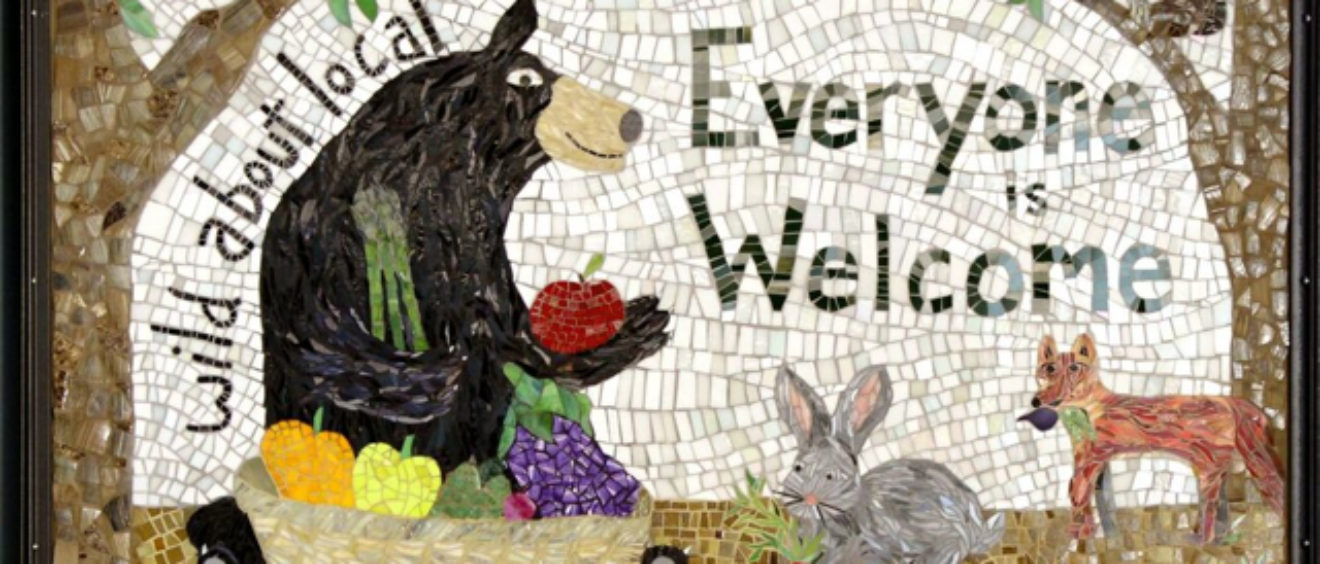
As a member owner of River Valley Co-Op, I learned this summer that a re-branding and renovation was planned for the fall. As a mosaic artist, I began to think about how exciting it would be to create a mosaic mural for the entryway of the store, depicting the adorable new black bear logo with a “wild about local” theme.
Mosaics are made by cutting and assembling many small pieces of various materials into patterns and designs. They are so intriguing to look at, possibly because of how the brain and the eye work together to discern images, pulling together all the disparate pieces. They call to mind how each of the many parts of the whole are so important to the overall design, and how they work together synergistically. It’s a great metaphor for community, unity and diversity. It is also exciting to look at a mosaic and find recognizable materials, used out of context. Many types of recycled materials and found objects can be used in mosaics, including pieces of broken pottery and china, ceramic tiles, stained glass, figurines, game pieces, stones, beads, cutlery, keys, bottle caps, plastic lids, and other odds and ends from the junk drawer. Thus, mosaic is an art form that can be economical, and environmentally friendly, turning life into a treasure hunt of sorts. These are just a few of the many reasons why I have chosen this as my medium, and why I thought it would be the perfect medium for a welcome mural for River Valley Co-Op.
My initial meeting with Rochelle and Natasha filled me with excitement about all of the possibilities for the design. Our conversation led me toward a cartoonish style, that would be kid-friendly but not too childish, including animals eating and harvesting vegetables. The new Black Bear with asparagus was destined to play the lead role, but I had to cast the other characters, and ultimately decided on the Red Fox, the Rabbit and the Squirrel. Of course, there was no shortage of locally grown vegetables to include in the design. I chose some that would give a variety of colors to enhance the design. Here is a picture of the sketch that became the blueprint for the mosaic. Some changes were made to the design, such as the wording.

Mosaic drawings are called “cartoons” because they are meant to be nothing more than a simple line drawing. The detail and texture come from the careful arrangement of the mosaic tesserae, or pieces.
After the design was approved and the colors chosen, I set about collecting the materials. I used recycled stained glass for much of the background, and I ordered glass tiles for the areas where I needed specific colors, specifically for the animals’ fur and some of the veggies. Then my friend Steve Theberge, who is a local potter, gave me a box of his mugs, bowls and vases that he had determined to be “seconds”. Some of them were perfect for making tree bark, with great textures and streaks. I did a combination of smashing with a hammer, and careful cutting with a nipper to turn the pottery into perfect mosaic materials.
 Box of Steve Theberge’s pottery seconds ready to be cut up and made into pieces of trees.
 Arranging the pieces of mosaic on contact paper to form the design.
  Arranging the pieces on the contact paper to form the design.
Working in this method, called the double indirect method, I have the flexibility to move the pieces around until I’m happy with the arrangement. The contact paper holds things in place just enough for this. When it was all laid out, I covered the top surface with frosty contact paper, so it was sandwiched between two layers. I took an exacto knife and cut the giant “sandwich” into about 25 large puzzle pieces, cutting through just the contact paper.
 Cutting the mosaic into sections like puzzle pieces.
  The mosaic cut into sections, secured to the contact paper and flipped over.
One by one, I flipped the sections over, braced between sheets of cardboard, and peeled the backing. Now the pieces were face down with the back exposed. Then I prepared my adhesive, which was a cement-based mix called ‘thin set mortar’. I spread it in small sections onto my substrate, a 3’ x 5’ sheet of WEDI board, which is a compressed Styrofoam coated in cement, making it lightweight and rigid. I have a special technique to make sure I have just the right amount of mortar on the board to hold the sections of mosaic in place, and one section at a time, I spread the mortar onto the board with a notched trowel, tested the thickness, and attached the mosaic.
 Attaching the sections of mosaic to the board.
  Securing the sections of mosaic in the mortar.
After the adhesive set for about 15 minutes, the tesserae were secure enough that I was able to peel the contact paper off the surface and allow it to continue curing for at least 24 hours. Then it was time to grout. Grout is the colored cement based substance that fills the gaps between all of the tesserae and serves to unify the design a bit more. I used a few different colors of grout for different sections of the mosaic, carefully smooshing it into place in a circular motion, and then wiping the surface clean. Then, 72 hours later, after the grout cured completely, I gave the surface of each piece a final polish. Then it was ready to install! I was so excited to collaborate with my friend Pat Bennet, a local sculptor, who built the steel frame and cleat system to attach the mosaic to the wall in a way that leaves almost no mark and can be easily moved if it ever needs to be.
 Pat Bennet securing the steel frame to the wall in the entryway of River Valley Coop.
I am thrilled to have had the opportunity to create this mural for River Valley Coop, a store I love to shop at, with a mission I’m passionate about. I also have a passion for spreading awareness about the art and technique of mosaics, which has been practiced for centuries and is now going through a contemporary resurgence of popularity. In addition to designing and creating custom mosaic installations, I teach workshops for adults and teens on the process described here. I hope that this mural will make people smile when arriving at River Valley Co-Op, and feel welcomed by all of the friendly animals.
